
zCX Implementation and Monitoring
- Our environment
- Starting with zCX
- zCX Service
- TCP/IP Updates
- Creating a container instance
- Starting zCX
- Signing on to a zCX instance
- Monitoring zCX
- Implementing our monitoring container
- References
Our Environment
We have an 8516-T02 (z15s) with two kneecapped general purpose processors, four IFLs, and a zIIP. Our DASD is all solid state devices.
Our primary interest is in monitoring IBM z operating systems. Primarily z/VM, Linux, VSE, and z/OS. We also monitor certain applications running on Linux, Oracle, JVMs, MongoDB, Docker, and OpenShift.
For Docker we wrote an SNMP MIB that runs on the Linux machine that hosts Docker. For OpenShift, we have a container that provides proprietary code to monitor the pods and containers that make up OpenShift.
Since the Docker environment on z/OS is a closed system, we can not install SNMP nor our MIB. We had to modify our container to install in zCX to be able to monitor Docker and the containers.
We are certain that our OpenShift container will work exactly the same as it does on Linux.
Starting with zCX
zCX has the following hardware requirements:
- IBM z14, type 3906, with the GA2 driver level.
- IBM z14 ZR1, type 3907.
- IBM z15, type 8561 model T01
- IBM z15s, type 8562 model T02
Using the zCX feature requires entitlement. One of two features have to be purchased. See your business partner or IBM for more details.
There is also a 90 day trial available. To start the 90 day trial update your IFAPRDxx parm lib member with the following product definition:
PRODUCT OWNER('IBM CORP')
NAME('z/OS')
ID(5650-ZOS)
VERSION(*)
RELEASE(*)
MOD(*)
FEATURENAME('zCX TRIAL90')
STATE(ENABLED)
To start the trial without an IPL, issue the following command to activate the
updated IFAPRD member:
SET PROD=xx
where xx is the suffix of your IFAPRD member.
The description of the trial can be found in z/OS Planning for Installation, Chapter 5.
Pay close attention to the section of the manual or Redbook about creating a set of keys. Signing on to zCX uses password-less SSH.
zCX Service
Before starting zCX, it will be important to be current on maintenance. With the current holddata downloaded, run a missing fix report for fixcat 'IBM.Function.zCX'. This will provide a list of PTFs that needs to be applied. Be careful, these PTFs can contain very large pieces of data. Make sure your SMPNTS and SMPPTS datasets are large enough.
TCP/IP Updates
zCX needs access to the network. When a zCX instance is started, it will want connectivity right away. This is primarily to give an administrator access to the zCX command line container. From this command line, the administrator can issue Docker commands to download containers from the Docker hub and deploy them. This Docker command line on zCX works very much the same as it does with Docker on Linux.
Never having worked with Dynamic VIPAs, this is part of the process that took a while to figure out. None of the examples were very helpful in this area either. Maybe because customer networks can be so complex and varied. I wanted to keep it as simple as possible.
This is the configuration that I ended up with:
DEVICE IUTSAMEH MPCPTP
LINK LOCAL MPCPTP IUTSAMEH
HOME 172.16.0.254 LOCAL
VIPADYNAMIC
VIPARANGE DEFINE 255.255.255.255 192.168.7.23 ZCX
ENDVIPADYNAMIC
The samehost device (IUTSAMEH) must be used. As far as I can tell, the IP address on the HOME statement isn't really used for anytihing.
The host z/OS system's IP address is 192.168.7.22. The zCX instance can be reached at 192.168.7.23, which is the address on the VIPARANGE statment. For multiple zCX instances, additional VIPARANGE statments can be provided.
Creating a container instance
zCX instances must be created using zOSMF. A number of workflows are provided that allow the systems programmer to
- Provision a container instance
- Update the configuration of an instance
- Add a volume to an instance
- Deprovision an instance
- ...more
Use the provision workflow to create a new container instance. A container instance can be used to run many containers.
The provision workflow is located in /usr/lpp/zcx_zos/workflows/provision.xml. Use the 'Create workflow' function to start the workflow.
In the Network Configuration section make sure the IP address matches the
value specified in the VIPARANGE statement.

Three model 9 sized disk devices were used to store the files required for the zCX instance.
A zFS file system was created by the workflow, in addition to an instance
configuration dataset. Additional VSAM linear datasets were created for the
operation of the instance - a root file system, a data file system and a swap
area.
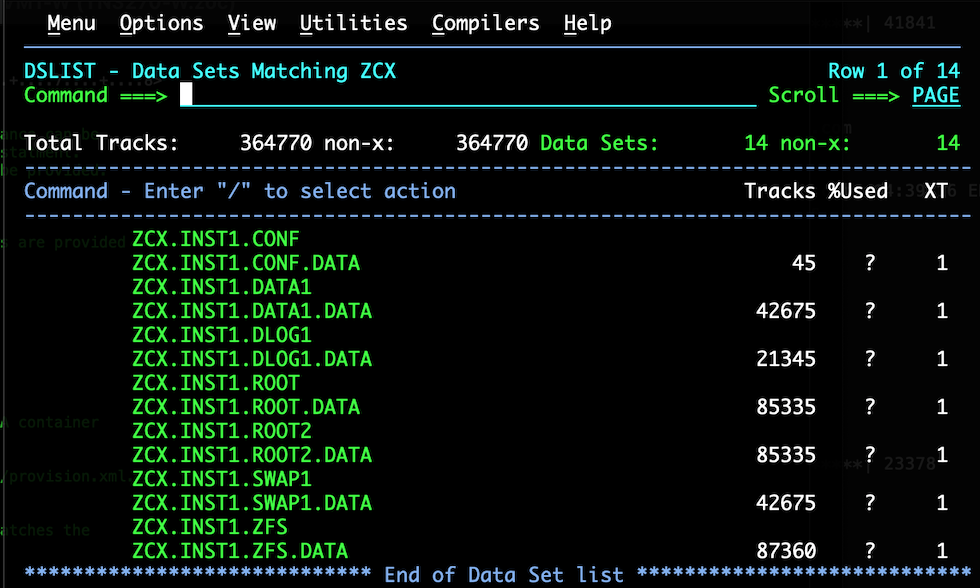
In the above image, notice ROOT and ROOT2. When maintenance is applied to zCX it may need to load a new root file system. Right now, zCX is running with ROOT2. If maintnenace is applied again, it will likely be swapped back to ROOT.
Starting zCX
The very last step of the workflow shows how to start your newly created zCX instance. The command looks something like this (based on the location and name of the configuration file)
s glz,jobname=inst1,conf='global/zcx_zos/instances/INST1/start.json'
The job log during the startup of zCX looks like the following:
IEF403I INST1 - STARTED - TIME=16.25.34
GLZB025I zCX instance INST1: Initialization has started. Code date 03/09/23.
GLZB027I zCX instance INST1: Checking host virtual environment.
IEE252I MEMBER CTIGLZ00 FOUND IN SYS1.IBM.PARMLIB
GLZV002I zCX INST1 is formatting available space for use by
DSN=ZCX.INST1.CONF
GLZV003I zCX INST1 formatting complete for
DSN=ZCX.INST1.CONF
GLZB027I zCX instance INST1: Allocating guest memory.
GLZB023I zCX instance INST1:
Guest storage size 2GB.
Backed by 524288 4K pageable then fixed pages.
GLZB027I zCX instance INST1: Loading guest image.
GLZB022I zCX instance INST1 version information
Bootloader:           HZDC7C0             oa63032
                      3.7.3               2.2.1
Current Appliance:    HZDC7C0             oa64578
                      4.4.9               1.23.0
                      20230517T153316Z
Available Appliance:  HZDC7C0             oa64578
                      4.4.9               1.23.0
                      20230517T153316Z
Virtualization Layer: HBB77D0   UJ92364   03/09/23
                      Started on 2023/08/25 16:25:34
Workflows Performed:
Provision:            1.1.4     OA64231   2023/08/17 14:00
Reconfigure:          1.1.4     OA62313   2023/08/25 16:17
Upgrade:              1.1.4     OA62313   2023/08/20 20:42
Add Data Disks:       N/A       N/A       N/A
Add Local Stg Disks:  N/A       N/A       N/A
GLZB027I zCX instance INST1: Starting virtual CPUs.
GLZB001I zCX instance INST1 initialization is complete. Code date 03/09/23.
GLZB027I zCX instance INST1: IPLing guest and starting Docker services.
GLZM004I zCX Docker services for instance INST1 are available.
Signing on to a zCX instance
When signing on to zCX you are really signing on to an ssh container that comes as part of zCX. It is the admin command line interface to Docker and zCX.
The rsa private key file that was created when the ssh keys were created is used
as part of the signon process. From a Linux or MacOS command line, the command
looks like this:
ssh -i zcx_rsa -p 8022 admin@192.168.7.23
If you are successfully connected, the result will look like this.

Standard Docker commands generally work (with a few exceptions that are
documented. To see the list of containers...

The container showed is the command line API container. It should always be running and not removed.
For Putty:
ip-addr -ssh -P 8022 -i PATH_TO_PPK_FILE -l admin
Monitoring zCX
zVPS can monitor jobs running on z/OS. Our ZOSJCPU (z/OS Job/Step CPU Resource
Analysis screen) will show all jobs running on a z/OS system. Those jobs can
be filtered by z/OS system name and jobname as shown below.
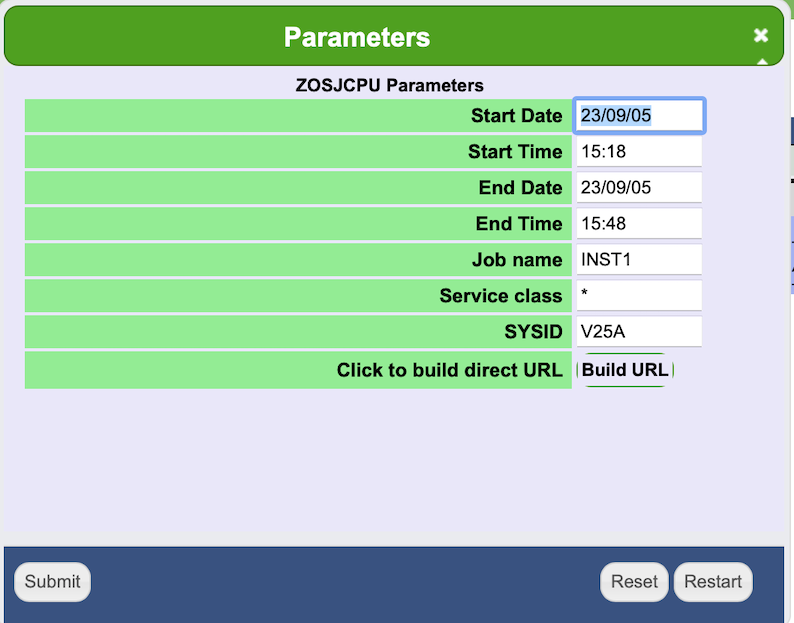
After entering the filter criteria and hitting the 'Submit' button, the following
screen is displayed.
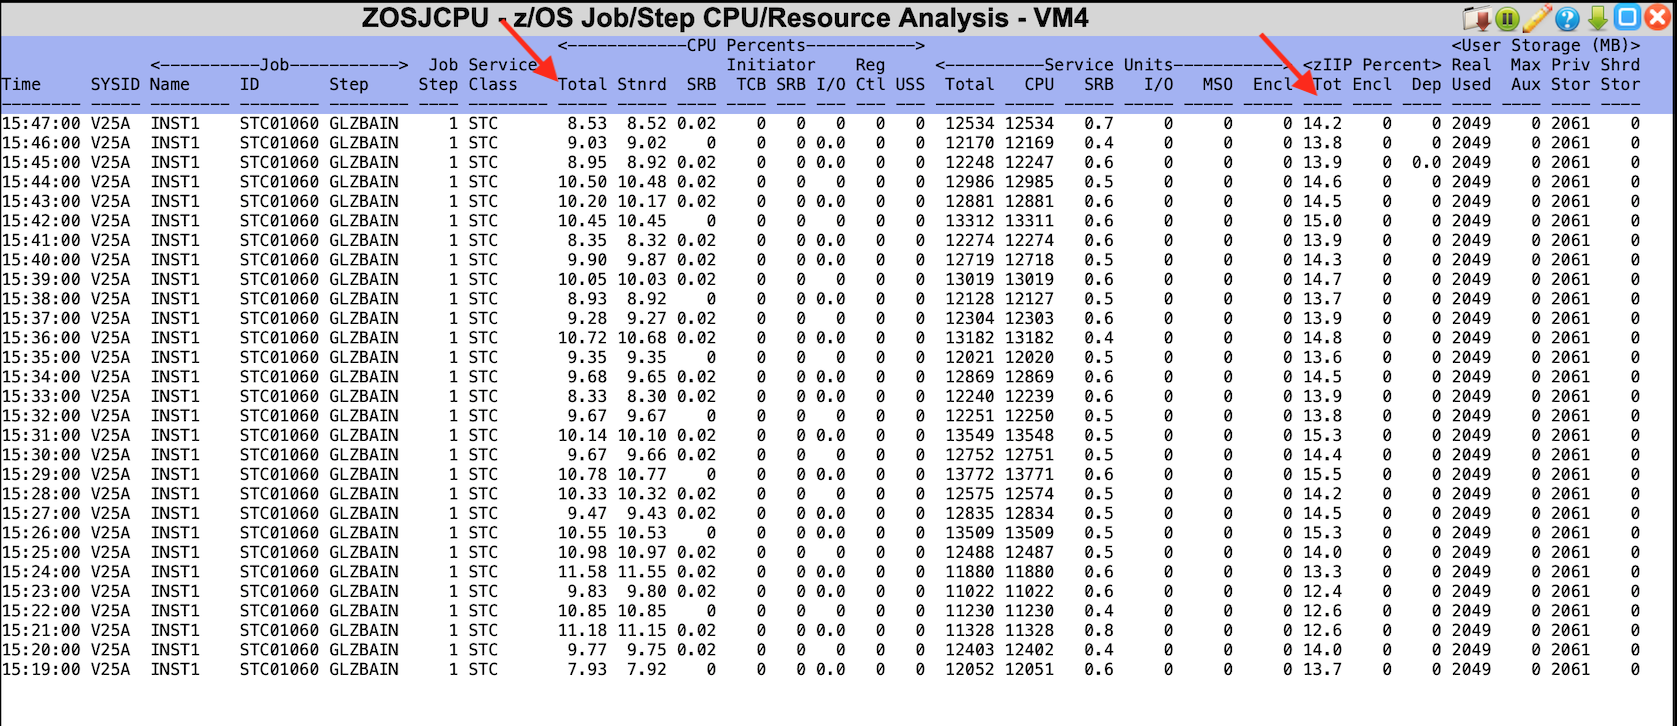
The CPU Utilization column (the red arrow on the left) shows that even in a mostly idle state, zCX is consuming about 10% of a general purpose engine. And about 14% of a zIIP (the red arrow on the right).
That screen (and accompanying graph) is good to see the external use of Docker and zCX, from the job point of view. We provide a container image that can be installed on Docker (whether it is a Linux machine (running on z or x, or zCX itself). This way the container internals can be shown as well. The container is agnostic as zCX is really just Linux.
Implementing our monitoring container
In the customer download area of our website is a container image called VSISNMPD.S390XTGZ. Download it and transfer it via ssh to a file on the Docker CLI image.
Once it is uploaded, it can be loaded into Docker with the following command:
gzip -cd VSISNMPD.S390XTGZ | docker load
After the load is complete, start the container with the following command: (spread across two lines)
docker run -d --read-only=true -v /proc:/host/proc:ro -v /sys:/host/sys:ro -v /dev:/host/dev:ro -v /var/run/docker.sock:/host/var/run/docker.sock

-p 161:161/udp localhost/vsi-snmpd-dkr
While the container is running, the command 'docker ps -a' will show it (see the first entry):

References
z/OS 2.5 Planning for Installation (GA32-0890)
Getting Started with zCX Container Extensions and Docker (Redbook) (SG24-8457)
z/OS 2.5 z/OS Management Facility Configuration Guide (SC27-8419)
